
Cozy DIY: Perfect Dried Orange Slices Made Simple
Discover the secret of how to make beautiful, even dried orange slices right in your oven. A simple, cozy DIY for Christmas garlands, gifts, and natural holiday decor.

The scent of cinnamon and oranges always feels like Christmas to me, warm, nostalgic, and cozy in the best way.
A few winters ago, we were watching it snow outside our window in New Jersey, I was making simmer pots with the kids slicing oranges to add when we decided to try something new: drying oranges for garlands.
It sounded simple enough, but our first few attempts were anything but perfect. Some burned, some stayed sticky, and we ended up laughing over trays of half-finished slices.
Eventually, after a little research (and a lot of trial and error), I learned the secret to getting perfectly dried, golden-orange slices every time. and I’ve been hooked ever since.
Why You’ll Love This Cozy DIY
Drying oranges has kind of turned into a yearly thing for us.
It’s simple, smells incredible, and makes the whole house feel cozy.
Plus, it’s one of those projects that doesn’t take much effort but instantly makes it feel like Christmas at home. It’s easy, affordable, and makes your home smell like Christmas magic.
But beyond that, dried orange slices are so versatile. You can string them into garlands, tuck them into wreaths, tie them on gifts, or drop them into a simmer pot on a chilly morning.
And they last for months, so you can make a batch once and enjoy them all season long.
It’s one of those cozy homemaking projects that doesn’t require perfection, just time, patience, and a little Christmas spirit.
What You’ll Need
You don’t need anything fancy to make beautiful dried orange slices, just a few simple tools and a little time. Here’s what I use every year:
- Fresh oranges: I love navel or cara cara oranges for their color and sweetness, but blood oranges look stunning mixed in.
- A mandoline slicer: This is the secret to even, perfect slices that dry evenly. I’ve tried using a knife before… let’s just say the mandoline was worth every penny.
- Paper towels or a clean dishcloth: To gently press out excess juice before baking.
- Baking sheet: Any standard sheet pan works, but I like one with a rim so slices don’t slide off when I flip them.
- Parchment paper or a silicone baking mat: Keeps the oranges from sticking and makes cleanup so easy.
- Cooling rack: Optional, but helps them finish drying evenly.
- Twine or ribbon (optional): If you plan to turn them into garlands, ornaments, or gift toppers.
You can buy my favorites listed here:


Step-by-Step: How to Dry Orange Slices
Step 1: Preheat and Prep
Start by setting your oven to 200°F, low and slow is the key here. Line a baking sheet with parchment paper or a silicone mat. I usually grab two baking sheets so I can do a big batch at once.
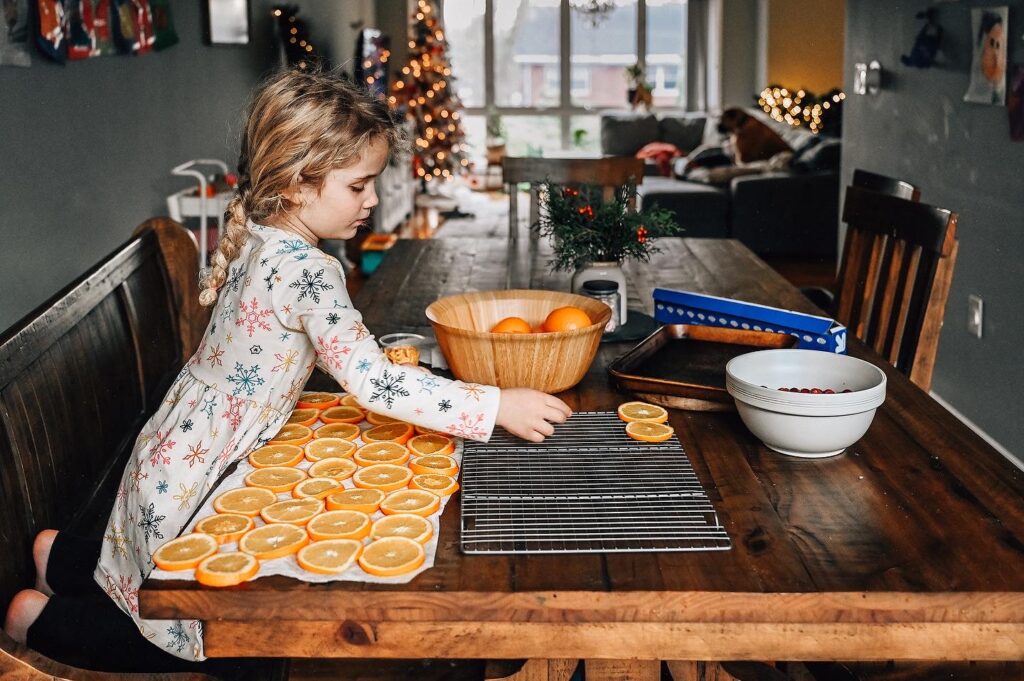
Step 2: Slice Evenly (This Is the Secret!)
While the oven heats up, slice your oranges in half and get them ready for the mandoline.
Here’s where everything changed for me: a mandoline slicer. I used to cut them with a knife, but no matter how careful I was, the slices were always uneven. Some would burn, others would stay juicy. The mandoline gives you perfect, even slices every single time, I like them around ⅛ inch thick.
Once they’re sliced, pat them gently with a paper towel to soak up some of the juice. It helps them dry faster and keeps their color nice and bright.
Step 3: Arrange and Bake
Lay your slices in a single layer on your baking sheet, no overlapping. Slide them into the oven and bake for 2½ to 3 hours, flipping every 45 minutes or so.
Your kitchen is going to smell incredible during this part, like orange tea and Christmas all at once. Don’t rush it though, low and slow really does make the difference. You don’t want to burn them.
Step 4: Cool Completely
Once the slices look dry and slightly translucent, pull them out and let them cool on a rack. They’ll firm up as they sit. If any feel a little sticky, just let them air-dry for a few more hours.
When they’re fully cool, you can store them in an airtight jar or use them right away for garlands, gifts, or simmer pots.
The Sweetest Little Tradition

Every time we slice oranges together, the whole house fills with that warm, citrusy smell that feels like childhood, holidays, and home all at once. Little hands help place each slice on the tray, someone always sneaks one to eat, and we all peek into the oven like it’s a tiny bit of magic. These are the moments I hope my kids remember, the simple rituals that make a season feel special.
And if you want your home to smell even cozier while those slices dry, don’t miss my simmer pot post. It’s another one of those easy, heartwarming traditions that makes an ordinary day feel a little more magical. 🍊✨
For more on motherhood, cozy recipes, homemaking tips, and seasonal inspiration, you can find me over on Instagram, Facebook, Pinterest, and YouTube. I’d love to have you along.
Last update on 2026-07-21 / Affiliate links / Images from Amazon Product Advertising API