
How to Take Family Christmas Photos at Home: Mom-Friendly Tips
Learn how to take family Christmas photos at home of your kids with simple, real-mom tips. Easy setups, cozy ideas, and stress-free tricks for capturing Christmas magic.

Holiday photos with kids always sound simple in theory… until you’re standing in your living room with one child missing part of their outfit, another jumping on the couch, and someone asking for a snack before you’ve even touched the camera.
But after taking our own Christmas photos at home and learning a few tricks from behind the camera…. I’ve realized something… family photos don’t have to be perfect to be beautiful. They just need to feel like your family.
At-home Christmas photos take away the pressure of rushing to a studio, fighting tight schedules, or begging everyone to smile on command.
And if your family is anything like ours, bringing five kids into a studio sounds… less than ideal.
I’ll be honest, I’ve thought about booking Christmas minis, but they always have limits on how many people can be in the photo, plus coordinating outfits, managing moods, and hoping everyone cooperates at the exact time you’re scheduled? Honestly, it’s a lot.
This year, I decided to skip the stress and take our photos at home, where if someone is having an off day, it doesn’t derail everything. I didn’t pay for a session, so I can simply try again tomorrow if I need to.
The pressure kind of fades away when you’re taking your own photos at home. You get flexibility, a little chaos, genuine giggles, and moments you’ll want to remember forever.
In this post, I’m sharing my favorite mom-friendly tips for capturing sweet, simple family Christmas photos right at home, no fancy gear, no complicated setups, and no perfection required.
Just real life, real kids, and a little bit of Christmas magic.
Why At-Home Christmas Photos Work Better for Moms
You’re not fighting a deadline. One of the biggest gifts at-home photos give us is time. There’s no rushing across town, no squeezing everyone into a tight fifteen-minute studio slot, and no debating whether to show up sick or skip holiday photos altogether.
This year proved that point perfectly. The morning I planned to take our pictures, I woke up with a stye and one eye completely swollen. If we’d booked a studio session, I would’ve had to cancel and then panic about whether we could even find another opening because we all know holiday sessions disappear fast.
At home, none of that mattered. I simply waited a few days, felt better, and tried again. That kind of flexibility? Truly priceless for moms.
Kids feel more themselves at home. When kids are in their own space, the tension disappears. The play, laugh, and just have fun which is everything you want in a real family photo.
You can work around real-life moments. If someone needs a snack? No problem. Someone needs to go to the bathroom? It’s okay you aren’t limited to a 15 minute session. Baby needs fed? Take your time, your on your own schedule. You can pivot, reset, and try again without any stress.
You save money. Christmas time is already an expensive time of year with kids and gifts. At-home photos gives you the freedom to capture images when you want without worrying about rescheduling fees if your day gets too chaotic.
A Look Back at Our At-Home Family Christmas Photos Through the Years
Before we jump into the tips, here’s a little look back at some of the Christmas photos we’ve taken at home over the years. Each year looked a little different.. different ages, different energy levels, different cozy corners of our home, but every photo holds a tiny piece of our life in that moment. Nothing fancy, just real memories with my favorite people.
2018: Simple Wreath on my Headboard. One year I hung a wreath on our headboard and let the kids sit on the bed with cookies. It was seriously the easiest setup ever, and the photos were precious.

Dec 2019: Kitchen Baking. This year I decided to just take photos of us baking together. I had added a garland to our island to add a little festive touch and we put on our Christmas pajamas.

2021: Holiday Chaos. Honestly, this might be one of my favorite years, right behind 2025. I took these photos in November after my husband got the call that he’d be deploying and would miss Christmas. So we put the tree up early, baked cookies, and decorated gingerbread houses so he could be part of the magic, too. While he snuck off for a quick nap, the kids started dancing and playing… and somehow that moment captured exactly what that season felt like. Messy, sweet, and full of love.

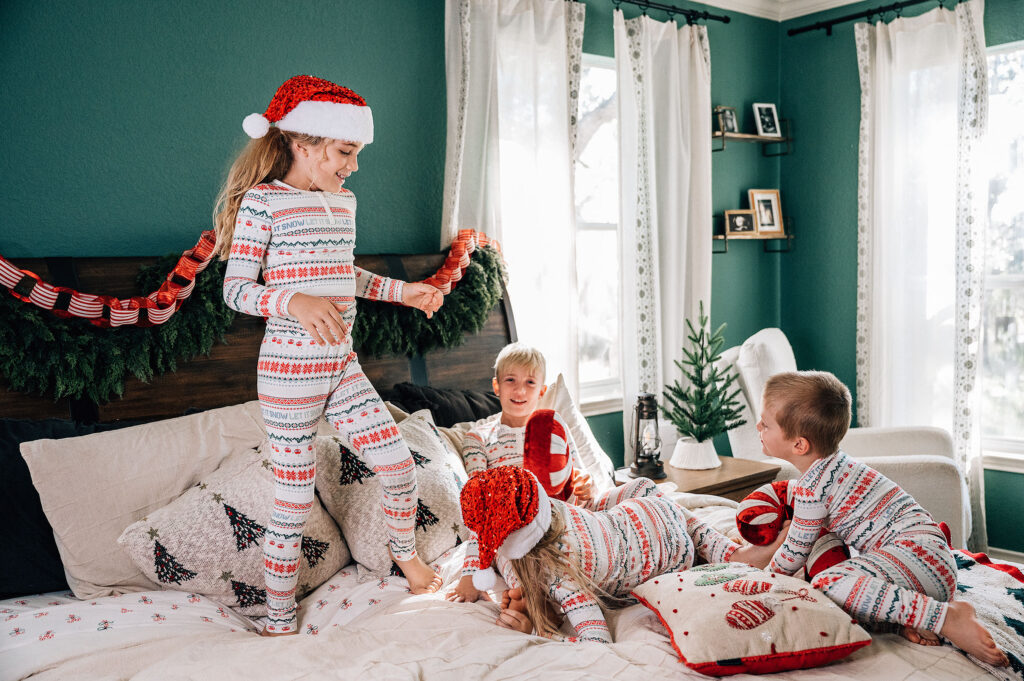
2025: Cozy Chaos. This year, I decorated our bedroom “a little more” than usual. I added garland over the headboard, a ribbon garland I made myself, cozy pillows, and a few touches that made the space feel warm and festive. Nothing too elaborate, but just enough to give that cozy Christmas glow.


Each year reminds me that the magic isn’t in the perfect setup, it’s in capturing our family exactly as we are.
And now that you’ve seen a few of the ways we’ve done it over the years, let’s talk about how to capture your own family Christmas photos at home and choose the perfect spot in your home.
Family Christmas Photos at Home
1. Decide on Outfits (Before You Do Anything Else)
Before you start decorating or setting up your space, decide on the vibe you want for your photos.
Are you going for cozy Christmas pajamas, the kids’ favorite holiday outfits, ugly sweaters, or something a little more dressed up?
Picking the look first will guide everything else, the location, the colors, and how casual or formal you want the whole moment to feel.
Here’s what I recommend as a mom of five: holiday pajamas.
Kids love wearing pajamas. They’re comfortable, they’re festive, and no one is complaining about stiff sweaters or scratchy textures. I’ve had years where one of my kids refused to wear “fancy pants,” and it turned into a whole thing, so pajamas became our go-to. They’re cute, they’re cozy, and they instantly feel like Christmas without any extra effort.
Plus, matching (or coordinating) pajamas make the whole photo feel intentional without feeling overdone.
One of my biggest rules when it comes to capturing family Christmas photos with kids is setting up the shot before I have them come in.
2. Choose a location
Once you’ve decided on outfits, the next step is choosing where you’ll take your photos. This doesn’t have to be complicated, the best locations are the cozy, everyday places your family already spends time in.
And the great part about at-home family Christmas photos is that you can switch it up each year depending on your vibe.
Look for the best natural light first
Before your even start to think about decor or props, walk around your home and look for light. And I don’t mean the over head lights, turn those off. We want light that spills through your windows and doors.
Soft window light is ideal, it makes skin tones look warm and cozy and keeps everything feeling natural.
Even when you’re taking your photos, you’ll want to make sure the overhead lights are turned off because they can add weird shadows and yellow tones to your photos.
The plan is to stick with our windows as a main source of light.
Also, notice the time of day the light falls on that location.
This year I watched my bedroom window, the light hit beautifully around 10am and continued to dance around the room until about noon and then it disappeared. That meant I had a very specific window to shoot in, so I planned our photos around that time frame.
This little bit of awareness makes a huge difference. When you know when your space looks its best, the whole process becomes easier, and your photos instantly look brighter and more magical.
Pick a spot that matches your “outfit vibe.”
Pajamas? The possibilities are endless, your bed, the kids bed, or even the couch! You can even dance around the Christmas tree or bake cookies.
Dressier outfits? You’ll want a decorated space, maybe intront of the tree, by the mantle, or even in a clean corner with great light.
Playful outfits or even casual? Let the kids run around and have fun, think dance parties, decorating gingerbread houses, baking cookies, jumping on beds.
The location you choose should match the feel you’re going for, not create more work for you.
Consider the spots you’ve loved in christmas past
If this is your first time taking holiday photos at home, don’t overthink it, just choose a cozy spot with good light.
But if you’ve ever taken a quick snapshot of your kids during past Christmas season, think about the moments you loved most, which photos do you love looking at.
Was it:
- your kids snuggled on the bed in their Christmas pajamas?
- everyone gathered around the Christmas tree?
- baking cookies in the kitchen?
- hanging ornaments on the tree?
Those everyday moments often make the best photo locations. If there’s already a spot that feels nostalgic or special to your family, start there.
And if you don’t have a favorite yet, thats okay! This year can be the start of your own little family Christmas photo tradition at home.
3. Set Up the Space (Decor, Lights, Background)
Now that you’ve chosen your location, it’s time to set up your space. I know this can sometimes feel a little overwhelming but it doesn’t need to be complicated.
You’re not creating a beautifully designed studio, you just adding a few Christmas touches at home.
The goal here is simple, make your space look clean, intentional, and festive without the stress.
Start with a quick clutter rest
Do a quick 15 minute tidy.
- Move toys or laundry out of the space, even if that means putting them in baskets.
- Straighten pillows and smooth blankets, if you’re taking photos on the couch or a bed.
- Close doors or drawers.
- Tuck away anything overly distracting.
- If you’re capturing a bedroom, I also try to make sure there no clutter under the bed that I might see in the frame.
And remember, the magic happens in front of the camera. Don’t worry about the space behind you, it can be total chaos.
Trust me, my desk in my bedroom held ALL THE THINGS, when we did our Christmas photos this year. I wish I would’ve taken a photo to show you.. No one but you will know the mess is behind you!
Add one to two festive pieces
You don’t need an extensively curated space, just a few pieces that add a bit of the Christmas vibe will be perfect…
Think of things like:
- a wreath
- garland on a mantle or headboard
- string lights
- your favorite holiday blanket
- festive pillows
One of two simple pieces can make your whole space feel warm without being complicated or cluttered.
Add small props
Since we’re dealing with kids, having a few small props on hand helps keep kids smiling and excited.
Here are a few ideas:
- holiday books
- ornaments
- cookies
- holiday toys
- candy canes (this was my go to this year)
Just keep the props minimal and on theme, so they aren’t overly distracting.
Create an entire mood and vibe
This is the fun part, I grabbed my iPad and started playing Christmas music for the kids. I even took song request from them once we started and they were extra excited to hear their songs.
4. Do Test Shots Before Calling the Kids In
Before you get the kids dressed and bring them into the space, take a few minutes to test everything. Trust me, this one little step makes the entire process smoother, calmer, and so much faster.
Why your test shot matters
As we all know, kids have such a short “photo window” they they’re willing to cooperate. Once they’re in the room, you’ll want to focus on keeping them relaxed and things moving.
You don’t want to be adjusting pillows or realizing you have a random toy in the frame.
Test your camera angle
Set you your phone or camera where you plan to take your photos.
Try a few different angles (straight on, slightly above, or maybe to the side). See which angle looks the best.
Make sure the space is photo-ready
I know we’ve done our 15 minutes tidy and decorated but kids are fast, there’s a chance they’re already brought in snacks, or toys to this space, maybe even bumped the garland.
Before you bring them in do a double take of the space to make sure it’s exactly how you want it.
5. Simple Photo Tips (For Phone Cameras or DSLRs)
You don’t need fancy gear to take beautiful photos at home.
Whether you’re using your phone, DSLR, or mirrorless camera, these simple tips will make your images better without being overwhelming for you.
Light
Remember, TURN OFF over head lights.
Light should hit your family from the front or the side, you don’t want it behind them because then their faces will be in the shadow and windows behind will cause a silhouette.
Camera Position
You’ll usually want to be at eye level with your camera, or slightly above., which means you may be kneeling, sitting, or lowering a tripod if you’re using one.
Step Back: You can always crop your images later, I prefer to step back and get a full scene shot because I know I can crop them down.
Don’t Zoom. This one is mainly for phone users but don’t zoom in because it will lower your quality of the photo. If you need a closer shot, step forward, if you want more in the frame, step back.
Once everything looks good & You feel prepared… THEN bring in the kids
You’re ready now. You know everything is how you want it, the technical stuff is thought out and now it’s time to bring the kids in and just have fun.
6. Bring the Kids In & Keep It Fun
Once everything is set, tested, and ready… it’s time for the stars to come in!
And here’s the truth: this step will go so much smoother when you focus on fun over PERFECT.
You’re not trying to force poses, you’re trying to capture real, cozy, happy moments. When the kids feel relaxed and excited, the photos will naturally look better.
Give them something to look forward to
You don’t need to bribe, but a “after photo treat” always helps. We made hot cocoa and enjoyed it together.
Start with playing, not posing
Don’t ask them to smile, trust me, it’ll probably not be the look you want. Instead..
Let them:
- jump on the bed
- snuggle on the couch
- twirl
- hold an ornament, toy, or candy cane
- have a pillow fight (this was our favorite)
- read a book together
Give simple (and silly) prompts
These will get natural smiles fast with kids:
- who can make the silliest face?
- tickle each other!
- look at the person who eats the most Christmas cookies
- on the count of 3, jump!
- look at your siblings and make them laugh
Take Breaks when Needed
If someone gets overwhelmed, pause, offer them a snack, let them dance,
You’re at home, there’s no need to rush.
Stay calm, even if they’r not
Kids will feed off your energy, if your frustrated they can feel it.
If you’re relaxed and smiling and happy, they will be too.
Take it slow, embrace the imperfect, and laugh at the chaos.
Let go of control and focus on connection
If your asking for someone to sit here, move that arm, smile.. you may find both yourself and them becoming frustrated.
Instead, try working on connection..
- can you do a big group hug?
- can you tickle your sister?
- can you hold the baby?
- can you pile on the bed?
Capture in-between moments
Some of my favorite images of those in between moments
- someone laughing at the other
- babying chewing on a toy
- siblings helping each other
Don’t worry if no one is looking at the camera
Honestly, I rarely make my kids look at the camera. Some of the most beautiful photos are:
- everyone looking at each other
- kids looking at a book or twinkle lights
- siblings laughing at each other
Keep it short
Remember, kids have a limited window.
Aim for 10-15 minutes of actually photo time, then call it a day.
If you didn’t get everything you wanted, that’s okay. I’m sure you’ll have something you love or you can always try again.
7. Simple Editing Tips for a Cozy Look
You don’t need to edit your photos but if you’re looking to edit them slightly, you can make your photos look warm, bright, and festive.
I love using Lightroom Mobile, it’s an app you can easily download and it’s free.
My favorite easy adjustments:
- brighten: increase your exposure slightly.
- warmth: you can add “warmth” but sliding your temperature towards the yellow for a “magical and warm” vibe but less is more.
- contrast : I always feel like this adds a pop of detail but don’t over do it because it can feel harsh.
- vibrancy: adding just a bit of vibrancy helps pop those holiday colors.
- shadows: holiday decor can something’s look dark, subtlety lift shadows.
A Few Last Cozy Word
At-home Christmas photos aren’t about perfect smiles, matching outfits, or getting everyone to look at the camera at the same time.
They’re about capturing the season you’re in, the tiny hands, the soft pajamas, the chaotic giggles, the wiggly toddlers, the love that fills your home in ways no studio ever could.
When you look back years from now, you won’t remember who blinked or who wouldn’t sit still.
You’ll remember the cozy morning light, the sound of your kids laughing, the way your baby curled into you, and the feeling of all being together in your little corner of the world.
That’s the magic of doing Christmas photos at home , you get to slow down, breathe, and let your family be exactly who they are. No pressure, no rushing, just the quiet beauty of your real life.
And if you’ve captured your photos and want to turn them into something special, like Christmas cards to send out to family and friends, I put together a whole blog post all about that, too. From choosing the right design to making them feel personal, it’ll help you take your cozy at-home photos and turn them into something meaningful you can share.

If this is your first year doing at-home holiday photos, I hope these tips help you feel prepared and excited to document your memories. And if it becomes a yearly tradition… even better. Those little moments add up to a story you’ll treasure forever.
For more on motherhood, cozy recipes, homemaking tips, and seasonal inspiration, you can find me over on Instagram, Facebook, Pinterest, and YouTube. I’d love to have you along.